")
Introduction
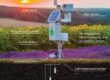
Pyranometers are sensitive instruments used to measure solar irradiance. Protecting them from unexpected electrical spikes or natural surges is essential to ensure their accuracy and longevity. This guide provides detailed instructions on how to safeguard pyranometers, including proper installation techniques and the use of insulator coatings.
Understanding Electrical Spikes and Surges
Electrical spikes and surges can occur due to lightning, power grid fluctuations, or switching operations. These can damage sensitive electronic components in pyranometers, leading to inaccurate readings or complete failure.
Safety Precautions
- Always follow electrical safety guidelines when installing and maintaining pyranometers.
- Wear appropriate personal protective equipment (PPE).
- Ensure the area around the installation site is clear and free of obstructions.
Tools and Materials Needed
- Pyranometer
- Mounting mast or solar panel mounting brackets
- Insulator coatings (e.g., epoxy, silicone)
- Surge protection devices (SPDs)
- Grounding rods and wires
- Wrenches and screwdrivers
- Cable ties and clamps
- Level
- Compass (for orientation)
- Ladder (for mast installation)
- Protective gloves and safety goggles
Proper Installation of Pyranometers
Step 1: Site Selection
- Choose a location with an unobstructed view of the sky.
- Ensure the site is level and secure.
Step 2: Assemble the Mast or Mounting Brackets
- Follow the manufacturer’s instructions to assemble the mounting mast or solar panel brackets.
- Secure the mast to the ground using the appropriate mounting method (e.g., concrete base, ground screws).
Step 3: Apply Insulator Coatings
- Apply a layer of insulator coating to the mounting plate or bracket to prevent electrical conduction.
- Allow the coating to dry completely before proceeding.
Step 4: Mount the Pyranometer
- Attach the pyranometer to the mounting mast or brackets using the provided mounting hardware.
- Ensure the pyranometer is level using a bubble level.
Step 5: Orient the Pyranometer
- Use a compass to orient the pyranometer to true north (for horizontal installations) or align with the tilt angle and azimuth of the solar panels (for panel installations).
- Lock the orientation in place with clamps or fasteners.
Step 6: Connect the Cables
- Run the pyranometer cables down the mast or along the solar panel frame, securing them with cable ties.
- Connect the cables to the data logger or power source according to the manufacturer’s instructions.
Insulator Coatings for Mounting Plates
- Use insulator coatings such as epoxy or silicone to electrically isolate the pyranometer from the mounting structure.
- Apply the coating evenly and allow it to dry completely before mounting the pyranometer.
- Regularly inspect the coating for wear and reapply as necessary.
Surge Protection Devices
Step 1: Choose the Right SPD
- Select a surge protection device (SPD) rated for the voltage and current requirements of the pyranometer.
Step 2: Install the SPD
- Install the SPD close to the pyranometer to protect against transient voltage spikes.
- Follow the manufacturer’s installation instructions for proper wiring and grounding.
Step 3: Connect the SPD
- Connect the SPD in parallel with the pyranometer’s power supply.
- Ensure all connections are secure and insulated.
Grounding Techniques
Step 1: Install Grounding Rods
- Drive grounding rods into the ground near the installation site.
- Ensure the rods are deep enough to provide a low-resistance path to earth.
Step 2: Connect Grounding Wires
- Connect grounding wires from the pyranometer and SPD to the grounding rods.
- Use appropriate connectors and ensure all connections are tight and corrosion-resistant.
Step 3: Verify Grounding
- Use a multimeter to verify that the grounding resistance is within acceptable limits.
Maintenance Tips
- Regularly inspect the pyranometer, mounting structures, and protective devices.
- Clean the pyranometer’s sensor surface to ensure accurate readings.
- Check the integrity of the insulator coatings and reapply as necessary.
- Test the surge protection devices and replace them if they show signs of wear or damage.
Troubleshooting
- If the pyranometer readings are inconsistent, check for obstructions or shading.
- Ensure all electrical connections are secure and free of corrosion.
- Refer to the manufacturer’s troubleshooting guide for additional support.
Contact Information
For further assistance and installation support, please contact us at info@hscontrolsystems.com.